2011/05/30

肥後守式小刀・Flriction Folder

思い返せば、最後に槌を振るったのはほぼ半年前になる。炭の火床とアンビルを出し、鍛冶作業を始めるとどうしても半日から丸一日の作業時間が必要となる。このために中々鍛冶をする時間を捻出できないために鍛冶作業から遠ざかっていた。
これでは悶々とする日が続くだけなので、簡易のガス炉を組んでみた。上手くすれば小物くらいなら1,2時間の作業で打てるはずだ。
Now that I think back, the last time I held my forging hammer was almost half year ago.
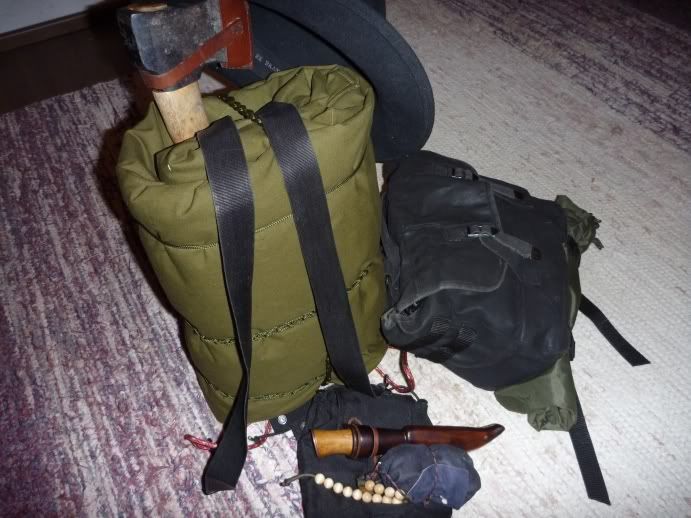
The reason was that if I pull out my forging sets and start the forging, I would need at least half day to one day of work time. And that was quite difficult get these days.
So, I thought fixing some easy gas forge might give some solution.
早速ガレージに行き耐火煉瓦を積み上げ、ハンドトーチに火をつける。ためしに古ヤスリを過熱してみた。何とか変態温度までは持っていける様なので、そのまま鍛造に入ってみた。
I should have sufficient material to make this set up, so went to garage and piled up the firebrick and lit the hand gas torch. To test this set up, I have heated up a old metal file… seems to be able to bring to transformation temperature so started to forge.
鍛造温度へはやはり持っていけないので、すのべ作業は無理、グラインダーであらかた形を出しそれを姿だしするだけの作業。小物作り用にはちょうど良い。
ついでにスプリングスチールのワイヤーも叩いてみた。スプリングスチールで、どのくらい切れるものが作れるか試してみるためだ。
It is not possible to brig it to forging temperature, so cutout the rough shape with grinder, then shape it with hammer. It is good enough for making small items.
I never have used the spring steel, so to see how it works as a blade material, I hammered a spring wire as well.

今回作っているはこれ、古ヤスリからは肥後守式小刀。スプリングワイヤーからは吹き矢用の矢尻。
This time, I have forged these. From the old file, blade for a friction folder and from spring wire, arrow tip for a blowgun darts.


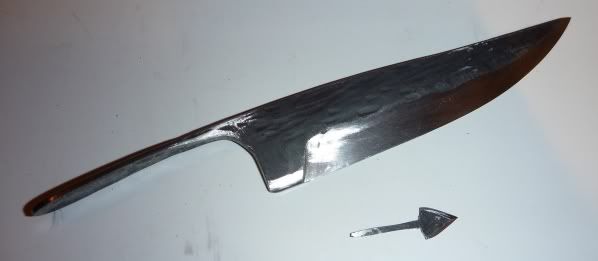
どちらも熱処理はまだ。フォルダーなのでまずはハンドルの方を作る必要がある。焼入れ前にハンドルとの摺りあわせをある程度しておかないとかなり大変な作業になってしまうし、そもそも穴あけ作業が出来ない。フォルダーの中で最も単純な肥後守構造、それでもシースよりはるかに手間が掛りそうだ。
I have not heat-treated these yet because I need to fit the blade to handle first. After tempering, it will be very difficult to make adjustment and make pivot hole to it.
the most symple constraction among the folder knife, yet takes lots more work than one fixed blade...

2011/05/27

ナイフ探しのウォークアバウト

いま、百さんのブログで、『最高ナイフ』と言うお題で話が盛り上がっている。
そもそも『自分にとっての最終/最高ナイフはなにか?』と言うことでかなりの数のナイフを試し、色々な角度から検証してきたお題で、過去にさかのぼって記事を読むととても興味深い。

そのナイフ探しのジャーニー、ブッシュクラフト的に言うと『ウォークアバウト』もどうやら何かを見つけてゴールに差し掛かったようである。
そこでふと、今自分はどのあたりなのだろうか?と思い直してみた。以前にも少し記事にした和式ブッシュクラフトナイフのプロジェクトがそれにあたるのだが、まだまだ出発地点をうろうろしている状態である。

一つだけほぼ確定しているのが方向。それは和式、もしくは和風であること。これは、和式刃物を使って育っているので、やはり一番しっくりとくるからである。そしてその容姿もとても好きだ。

その他のことはまだまだ模索中。現在検討中なのは>
大小のコンビ。大→刃渡り20cm全後。小10cm前後。
割り込みか三枚。
両刃。
小の方は微妙にクリップ気味のポイント、スカンジグラインド。
大の方は剣鉈とレウクの中間、ティップヘビー、コンベックスグラインド。
タングはテーパードタング
鋼材未定。
どちらもフィンガーガード無し
シースは多分木製。

といった感じ。今まで小のほうはドロップポイントの方向で来ていたのだが、自分のナイフの使い方を再検討してみた時に、クリップ気味の細いポイントの方が便利なことに気がついた。少し前に紹介したマキリ・PUUKKOもポイントを更に細めにしたら使いやすさが全然良くなった。
ドロップが悪いとか、不便とだとは言わない。ただ自分の使い方には合っていないだけだ。

最近は鍛冶作業の時間がまったく取れないのでなかなか先に進まないのだが、取り合えず木でモックアップだけは作っている。大の方はほぼ形が決まってきているのが、小の方はクリップ『気味』にてこずっている。モックアップが上手く出来るようにならないうちは、鍛造で成形なんて到底無理。夏休みまでには何とかものになってくれると良いのだが。

2011/05/25

Angry bird...

On the other day, when I was walking in the woods, I have noticed that there are many quite disturbed trees. Most of them are just bark peeled off like this.


It is the work of woodpecker (I think… cant think of any other) and quite often you see these. But on this area, it was just lots of trees affected by it.

As I continued the path, I came across this

The work of art? or what can I say… first I could not figure out what exactly is…


I think this is also the handy work (or should I say “beak work”) of woodpecker?
I just haven’t seen anything like this big. Also I have noticed that very close to the ground was carved. The bird like this usually does not like to spend long time close to the ground, so made me wonder, “Is this really by woodpecker? Or was it just really angry (hungry) bird?”

2011/05/24

Greenland wax test on poncho tarp – グリーンランドワックステスト

Yesterday morning, when I was leaving home to work, the sky looked like gonna be heavy raining. So, I quickly pitched up my poncho tarp, which waxed with Greenland wax, to see if really stands against the rain.
昨日の朝、空模様がとても怪しかったのでグリーンランドワックスの撥水テストをするために、タープテントを庭に張ってみた。
This is how it looked in the morning. Partially dark, because of the wax, not wet.
morning.
これが朝、雨が降り出す前の様子。タープの色の濃い部分はワックスのため。
and here is after 8h of under raining.
そしてこれが8時間雨に打たれ続けた後。
Till I get home it was raining and on about middle of the day, there was quite heavy raining. On out side, it looks like partially soaked wet, but if you look inside, it is not.
It only wet surface and the water did not penetrate the fabric. Checking inside, I could feel slight moist on fabric, but mostly completely dry. Also, after the rain stopped, the sun came up and the tarp fabric got completely dried up in 3h.
So, I would say, this Greenland wax totally works on canvas tarp I have, and now I am more confident on using this shelter system on real action.
仕事から帰るまでの間雨はずっと降り続け、お昼ごろにはかなり土砂降りに近い状態だった。早速確認してみると、外側はかなり濡れているように見える。が、中を確認してみるとほんの少し湿気が感じられるかな?程度でまったく問題ない。雨上がり後、太陽が出てきたのでテントをそのまま放置してみると、約3時間ほどで完全に乾いてしまった。賛否色々分かれるグリーンランドワックスだが、このキャンバスタープにへの使用に関してはかなりの成功だと思う。これで次からは安心して実際のキャンプで使える!

2011/05/23

1 spark 10min Tinder bundle ・松脂ティンダーバンドル

Other day, when I was walking woods, I have found large chunk of pine resin on tree. It is quite easy to spot this sort while on walk and if I have chance, I try to collect them, coz it is very useful to have for fire making and all kinds of crafts I do.
bur there is a issue when I need to correct it. If I have some container, then fine, but most of the time, I do not have. And if I stick the resin in my pocket… well you know what is going to happen. So here is the solution: wrapping it in “Old men’s beard” (Usnea).
先日森を歩いている時、かなり大きな松脂の塊を発見。松脂は結構簡単に見つけることが出来るし、焚き火や工作にと使用範囲が広い。
見つけるたびに採集するわけだが、一つ問題が有る。ポリ袋などの入れ物を持っていれば問題は無いのだが、そんな物いつも持ち歩いているわけではない。そこで考え付いたのが、霧藻 (サルオガセ)で包む。こうすればポケットに入れても松脂でベトベトになることは無い。


And when need to use it for making fire, just open it a bit, and simply strike the fire steel to it.  It will take spark in 1 or 2 strikes and before Old men’s beard burns out, the resin ignites. Once the resin starts to burn, then it will keep burning for quite long time with strong heat.
ティンダーとして使う時は簡単。包みを引きちぎるように開いて、ファイヤースチールで1~2回火花を飛ばせば簡単に燃え上がる。そして霧藻が燃え尽きる前に松脂が燃え出すのでもう慌てる事は無い。

The advantage of this bundle is that the materials are very easy to find and does not requite effort to collect it. Especially comparing to the work you need to put in to get fat wood, there is not work required to make this bundle, and works as good as fatwood.
このティンダーの一番の利点は、『非常に簡単に手に入る』事。ファットウッドと比べるとその違いは歴然、そしてファットウッドと同等に良く燃えます。

2011/05/20

皆様、ありがとうございます!Thank you very much to all of you!

今日久しぶりにブログの統計を確認してみて気がついた。
このブログを始めて6ヶ月ッ経ってました!!
I haven’t been checking the traffic analysis lately, but suddenly came to my mind so opened the Google Analytics page. And have realized that 6 months have passed since my first article upload on this blog.

そして気になったのでカウンターを見ると・・・
and so wanted to see the visitor count….


訪問数 / Visitor count :  4,220

そして  AND

ユニーク ユーザー数 / Unique Visitor count 1,993

ぇえ?? いつの間にか1000を思いっきり超えてる!!そしてリピーター率が53.08%、半分以上!これはとてもうれしいことです。
What!?! It is counting way over 1000! And 53.08% of repeating visitors!
This is really something of a BIG deal to me. So, I would like to say:


『皆様、当ブログを読み続けてくださいまして、本当にありがとうございます。
これからもがんばってアップしていきますので、宜しくお願いいたします。』

"Thank you all! I really appreciate your support. I will do my best to keep up what I do here and hope you continue enjoy visiting!"


OZme

2011/05/18

Waxing done and so the axe restoration.

Well last night, I finally finished the waxing of my poncho tarp and restoration of new/old axe.


The left side is the un-waxed (as purchased condition) sheet and the right side is the one I just finish putting 2 coats of Greenland wax.
Can you see that it got darker? Also repels water much better. I have tested by shooting the water with water spray, adjusted to shoot tight line of pressured water, directory to tarp from close range.  One without wax, water repels but surface gets soaked. One with the wax, totally repels and all sprayed water just rolls down. So now this tarp should hold even in pouring rain.


And the axe restoration…
Well this took really lots of time and work, since the firs helve I have fitted to this head has broken on first 3 swings… so this time, I took my time to carefully check the grain of wood and no to use uncertain part. 
There is bit of knots on the bottom, but that should not have any effect on strength, coz that part should not get that much of stress.

Now, I should take this to chopping test. If works good, this might become my choice of carry.
  

2011/05/17

フェールラーベン―グリーンランドワックス(Fjällräven - Greenland wax)

前々からやる予定でいて、なんとなく先延ばしにしていた撥水補強作業。重い腰を昨夜やっと上げた。
何を撥水補強するのかというと・・・これ。フェールラーベンのズボン。
I have been thinking of waxing this Fjällräven trouser for some time now, but some how was lazy doing it. However, now the weather is getting warmer and expect rain, I finally decided to do the waxing.
  

G-1000ポリコットン素材のこのズボン、フェールラーベンの衣類は、レイミアーズも頻繁に使っている様なのでずっと気になっていたのだが、先月ついに購入! 事あるご
とに使っているのだがとても調子が良い。痒い所に手が届くズボンとでも言うのだろうか、とにかく良い。

購入した状態ですでに撥水加工はされてはいるのだが、これからの時期、雨などで特に膝下が濡れやすくなる。そこで撥水性を部分的に強化することにした。

フェールラーベンのG-1000素材はすべてグリーンランドワックスを繊維に染み込ませて撥水性を出している。そしてこのグリーンランドワックスはパラフィンと蜜蝋で出来て
いるので自分で追加、除去が出来る。つまり状況に応じて、通気性を取るか撥水性を取るか調整できるわけだ。

これからの季節は気温が上がっていくので、濡れやすい所だけを強化し、通気性も同時に確保することにした。
ワックスを塗る場所は膝下周りとお尻の部分。まずはグリーンランドワックスをゴシゴシと擦り付ける。
It is G-1000 garment and this is my first Fjällräven trouser. I hve got this one few month back, and been using it since then… it is a wonderful trouser. Very functional, strong, comfortable and well water repel. But I wanted extra water repel on bottom and butt part of  this trouser.


満遍なく塗れたらヘアードライヤーかアイロンの熱(キャンプ時はキャンプストーブでも良い)で溶かし込む。

ほぼ新品状態のズボンなので、今回は1層だけ。布が冷えると少しごわごわするが、使ってるうちに解れるので問題は無い。
The wax I have used is Greenland wax. It is not quick and easy way, but sure this thing works. And the nice thing about this wax is that you have full control of add or remove and partially or entirely.

ズボンを作業したついでに、ポンチョタープも・・・
since I am at it, I decided on waxing my poncho tarp.


これは2層か3層塗る予定。しかし、この大きさだとさすがに大変だ。1時間かけて約1.5㎡-1層完了。全体の4分の1・・・続きは明日にします。

ちなみにこのグリーンランドワックス、編み目の細かいコットンやポリコットン全てに効果あります。衣類の様に、縫い目やポケットなどが多い物はドライヤーを使って溶かすのが便利。タープの様に大きな物はアイロンがお勧め。
ワックスを取り除くには熱いお湯で数回洗濯すれば良いそうです。
I am planning on waxing this 2 - 3 layers, but let’s see... waxing this size is not easy job at all… 1 tip on using this wax. If you are waxing a item, which has lots of seams and pockets, like trousers, then use hair dryer to melt the wax. If you are waxing large flat, like tarp, then iron. It makes the work easier.

2011/05/11

This one totally opened up new perspective!

Yesterday, I was going through YouTube contents for trying to find better way to wrap my self in wool blanket and different ways of packing bed roll. While I was at it, YouTube auto-recommendation gave me a link to “Wool blanket backpack” from NorCalBushcraft.
First I just thought that “it is a clever way of packing”. And he was also using same blanket I have. So I tried it myself as well…


Man!! This is not just a “clever” way, it really is INGENIOUSE!! Other day I was thinking of how to get padding on my shoulder strap. Because even I got wide strap, I was not confident that I can carry it for long walking. Also the stability of pack was not great.
By using blanket as shoulder strap, it gives more stability and comfort to shoulder. As you can see from picture, now I can mount the black shoulder bag as well.
Though I have changed my version a little from the original. The original one has only 1 point on bottom of the pack to connect the shoulder part. I have tried it that way firs, but did not work good for me. It blocks the blood stream of side of my body and that makes arm numbness. So I have attach the carabineers on lower both side of the pack to widen the bottom connection.
I still need to figure out better knots and strap adjustment methods, but this is definitely the way to go!

2011/05/09

New gadgets came in! – 新入りのお道具。

On weekends, I have got new gadgets to put in to my new packing system.
週末にいくつか新しい道具が手に入ったので紹介。

The first item is Italian army surplus 100%wool blanket. It is really stubby, but surprisingly not itchy. The size is 210 x 140cm and really nice, but the biggest problem with this is the anti moth small. I have let it breeze out for 2 days, but still smelling strong. This one goes to my bedroll.
まずは毛布。イタリア軍のウール100%のブランケット。デカイです210x140cm。ごわごわのなんだけど、あまりチクチクしないです。ただ、防虫剤のにおいがきつい・・・二日ほど干したのだけどまだ抜け切らない。これはベッドロールになります。
 The second item is Swedish army mess kit (aluminium model). I have found this one on flea market for 10euro. Totally in good condition, doesn’t look like been used much.
二つ目はスウェーデン軍の飯盒セット(アルミモデル)。使用済みですが、かなり状態は良く、ぱっと見は未使用かと思うほど。
I will replace the 1L stainless mug cup to this one. While on camping, I am not that in to instant food cooking, and do need some level of cooking capacity on pots and things. I am sure this will be a great addition to my kit. However, when was the last time I have used the mess kit.
1Lのステンレスマグをこの飯盒に置き換えます。キャンプ時は結構料理する派なので、このくらいの料理能力の有る物の方がやはり使い勝手が良い。
しかし飯盒を手にするのは何年ぶりだろう。

Then the next one is fire steel. Yes, it is again the Light My fire Fire steel but this time, it is “Fire steel 2.0”!!!
次のアイテムは言わずと知れたライトマイファイヤーのファイヤースチール。デモね、新モデルのファイヤースチール2.0!!
 So what is the difference?
何が違うのかって?? 

 Here is the old model next to new model. The steel size is exactly the same, but the handle design is different on both steel and striker.
旧型と新型を並べてみた。スチールは同じ大きさだが、ストライカーと、ハンドルの形状が違う。紐もちょっとお洒落になった。

But the biggest difference is the striker handle. If you look at closer, it has a new function on it! Yes, it works as emergency signaling whistle. And it makes really loud sound.
一番の違いはストライカーのハンドル。良く見ると新しい機能が付いている。
解るかな???そう、緊急信号用の笛!これはなんとなくうれしい。サバイバルキットに入れるにも、更に便利。

Now, all I need has lined up, so packed them all together.
これでほぼ必要なものは揃ったので、早速パッキングしてみた。
It packs quite good, and notice that I have figured out the bedroll carrying system. I have attached the shoulder strap from my old bag. It feels OK, I just need to try walking with it some distance some time to try out.
結構良い感じにまとまった。ベッドロールへは、担ぎやすいように幅広のストラップをかけてみた。これで有る程度の距離は背負っていけそう。

I have also tried out several ways to put up the 2 sheets poncho tent on my yard.
ついでに、ポンチョテントの色々な張り方を試してみた。使用したのは170x170cmのキャンバスポンチョ2枚繋ぎ。

The pyramid figure with and without center pole. This is most cozy and warm, but cant stretch your leg…
これが一番居心地良く暖かいのだが、 寝る時に足が伸ばせない→ちょっとキツイ。


This is the basic A frame config. As you can see, it gives very large space under the roof. The ground sheet in the picture is about 2m, so it really is enough. Just both sides are completely open, so it will not hold the heat in.
基本のAフレーム型。写真中のグランドシートが約2mなのでその広さが創造できるかと思う。大抵の状況ではこれで十分だと思う。ただ、両サイドが完全に開いているので、あまり暖かくは無い。


The last one is a shifted version of A frame. It gives nice openness and makes really nice space to hang around. Under the favorable weather, this might do just fine like this and if the weather turns, I can quickly put back to A frame.
最後の写真のものは Aフレームの変形型。オープンな空間を作り出し、マッタリと過ごすのに良さそう。天気が良ければこのまま寝てしまっても良いだろうし、天気が崩れてきたらAフレームに簡単に戻せる。


Well... now I got all this set up. I should find some time to get out and try out this new set for real.
ここまで揃ったら実際に森に行って試したくなってきた。何とか時間見つけよう。

2011/05/05

飛び道具熱が・・・

なんか最近飛び道具熱が出ております。
ま~ブッシュクラフトなんかをやっているので、興味の向く先はもちろん『プリミティブ・ウエポン』!

ウェポンとは言うものの、戦闘用武器ではなく狩猟用に使う/使えるもの。

別に狩猟をするわけではないが、作り方、使い方を知っていれば何かの役に立つだろうし、そもそも飛び道具は好きだし面白い。

プリミティブ・ウエポンと一言で言ってもいくつもある>
棍棒>使い方→殴りつける、叩きつける
ラビットスティック>使い方→投げつける
槍>使い方→挿す、投げる、叩く
スイスアロー>使い方→投げる。
投石器(スリング)>使い方→石を遠心力で飛ばす
吹き矢>使い方→ダーツ(矢)を肺活量を利用して吹き撃つ。
弓矢>使い方→弓を使い、矢を射出する。
パチンコ(スリングショット)>使い方→ゴムの伸縮を使い石などを射出する

どれもそれほど作るのは難しくないので早速作ってみた。
棍棒>ただの棒・・・作るほどの物ではないし、作っても面白くない上、飛び道具ではない。
ラビットスティック>ベア・グリルスも番組中でこれを使って、見事にウサギを捕らえた。威力はあるし飛び道具だが、ちょっと面白味に欠ける。作るのも簡単すぎ。 (狩猟用ブーメランはこれの発展形)
槍>狩猟道具、飛び道具としてはちょと・・・ 外したら終わり・・・面白味にも欠ける。
スイスアロー>この名前はちょっとマイナーかな?長い矢を紐や木で作った投具を使って投げる。簡単に作れるし精度も有る程度有る。が、好みではない。(詳しくはSwiss Arrowで検索してみてね!)
投石器(スリング)>カタパルトではなくスリング投石器の方。はっきりいって面白い!拳大の石が50mくらい簡単に飛んいくし、それが的中した時の破壊力といったらもう・・・デモね、精度がまったく無い←下手なだけ???
吹き矢>結構簡単に使えるものが作れるし、精度も有る。結構面白い、って言うかはまりそう。
弓矢>結構海外では多くの人が自作しているようで、もちろんお子様の夏休み工作竹弓なんかとは違う。丸木から削りだして、本格的に使えるもの。
しかしこれは材料に問題あり、良い材がなかなか手に入らない。作り方の基本は難しくは無いのだが、実際にやってみるとかなり材に左右されて難しい。したがってこれは当分保留・・・
多分作るのが一番難しいが、威力・精度・面白さ、どれをとっても最高。
パチンコ(スリングショット)>作るのが簡単で、弓矢なみの威力・精度・面白さを得られる。が・・・歴史が浅く、ブッシュクラフト的にちょっと???な存在。だって、森の中でゴムをどこから入手するのよ??

というわけで、当分は吹き矢、パチンコで遊びつつ、弓作りに使える材料が出てくるのを待つことにします。

2011/05/03

The selection - 選択

So last night, I have quickly put together the new selection of my equipments to carry. I thought the Minipack I have is the good base to start, so starting from adding the things that are missing for over night stay.
昨夜、新パック構成のための『選択』をやってみた。前回組んだミニパックを元に、一泊は可能になる様に必要な物を追加する。
Incase you have not see my previouse post about putting minipack, here are the links to those!!
前回のミニパックの記事はこちら!
http://bushnblade.blogspot.com/2011/01/my-new-mini-pack.html#links
http://bushnblade.blogspot.com/2011/01/my-new-mini-pack-part-2.html#links
http://bushnblade.blogspot.com/2011/01/my-new-mini-pack-part-3.html#links

After the selection, this is what I got left.
選択・再構成後残ったのがこれ↓


It is not final, but I think it is a start, and I think I am on the good direction.
これで完成ではないが、ここから更に選択を進めれば良い感じになりそう。
1) blanket + tarp ブランケット+タープ
2) Axe, SAK, Puukko, saw, pocket sharpener 斧、SAK、プーッコ、ノコギリ、砥石
3) kukusa + telescope ククサ+望遠鏡
4) para code 30m パラコード30m
5) Canvas bag, Navigation set, felt hat キャンバス製の鞄、地図+コンパス、フェルト・ハット
6) Woodgas stove + 1L cup + 1L alumium bottol ウッドガスストーブ+1㍑カップ+1㍑アルミボトル
7) Damp pauch ダンプポーチ
8) Food bag + Food 食料袋+食料
9) Fir stating kit /survival kit 救急セット・サヴァイヴァルセット
10) Fire starter kit 火打ち袋
11) Fishing kit つり道具
12) Poncho ポンチョ
Not in picture: 写真に無いもの
Japanese washcloth, mosquito head net. 手ぬぐい、モスキートネット。

and here is how it packed.
とりあえず全部パックしてみると。
my plan was to make shelter + bracket + stove+ food into Hudson-bay pack, but I need to work on that… I could not find the satisfying way to tie it up yet.
When packed, I have noticed few things.
>I do not need Woodgas stove, coz I only need that when I go to the location where open fire is not allowed.
>I need better “Wool” blanket.
>Need to think about the food. It needs to be high carbohydrate, heavy (to stomach), easy to clean, does not require multiple cookware.
> Need (want) Walking stick.

シェルター、毛布、ストーブ、食料はハドソンベイ・パックにする予定なのだが、いまいち気に入った縛り方が出来ない。これはもっと研究の必要あり!!
パックしてみると、幾つか気が付くことがある。
>ストーブ入らない!キャンプの時は焚き火OKの場合が殆どだから。
>毛布・・・もっとまともなのにしないと自信ない。
>食料の再考。1㍑カップ一つで料理でき、洗う手間が少なく、炭水化物を多く含むもので、腹持ちが良いもの!
>ウォーキングスティック!!必要というか、欲しい!
I think, I will play around with this setting little while to see what comes up.
とりあえず、あーだこーだいじり回して様子見てみます。

2011/05/02

I need to think about this!! – ちょっと見直し。

Lately, I am giving thought about “What makes the bushcrafter’s pack different from others’?”. Well yes, I know the gear you carry does not make you a bushcrafter but the things you do does. But on the other hand, the things you do should reflect the gear you carry.
最近『ブッシュクラフターの装備って何?』と言うことを考えるようになった。古い物、エコな物、ナチュラルな物で身を固めればブッシュクラフターなのか?と言えばそうでもないだろうし。しかしある程度その方向へ行かないとブッシュクラフトっぽくない。

 So I have piled up the gear I use/have and took moment to have good look at them…
そこで持っている物、よく使うものを積み上げてじっくりと考えてみた。


This was the set I used for last winter camping. It was a winter camping and was first time, so I put the extra and fancy (high-tech) equipments as safety margin. But still the base sat is my usual composition for night out.
…. This set does not look like bushcraft…. More like normal camping…
写真は前回の冬キャンプで使った装備。初めての冬キャンプと言うことで確実な物(ハイテクな物)を加えたわけだが、基本の部分は通常キャンプとあまり変わらない。
が、しかしこれはブッシュクラフトらしくない装備だ・・・

If it is spring to autumn season going to solo camp, I am confident that I am not going to need most of those.
冬以外の時期ならこれほどハイテクな装備は殆どいらない!自信を持って言える!

So I have compared this to my Mini pack, which I use for solo day trip.
(Not!! I say solo means going alone. When I am not on solo trip, usually need to accommodate my wife’s or friend’s comfort. So the equipment I carry increases accordingly.)
そこで、少し前に紹介したミニパックと比べてみた。


This is the base set of my mini pack. Adding food to this will make complete set for a day trip.
これが日帰り用に組んだミニパックの基本セット。食料を加えれば余裕で丸一日対応できる。

Based on this set, what will happen if I just add few items like:
そこで、このミニパックに次の物を足したらどうなるだろうか?
Good wool blanket 厚手の毛布
Tarp or large poncho(s) タープかそれに類似するもの
First aide kit 救急セット
Navigation equipments 地図、コンパス
Simple food 簡単な食料

When I imagine that set, I probably can go on for few days. Of cause, I cannot say for sure that I could, till I really tried it. or am I being optimistic?
But think about it, all you need for night out in forest is covered:
Food> yes
Fire> yes
Sleep and shelter> yes
Navigation > yes
Emergency > yes
Means to carry all above> yes

The only missing part is comfort, but that where “Bushcraft” comes in… RIGHT?
一泊どころか数日は何とかなりそうだ。もちろんやって見なければ自信はないが、そんなに無理そうでもない。基本な部分はカバーできている。だめな理由も特に無い。
快適に過ごせるか???という不安はあるが、そこをどうにかするのがブッシュクラフトでしょう??